react와 node js로 만든 프로젝트를 heroku cli를 이용하여 배포하는 방법에 대해 알아보자.
1. heroku cli를 다운로드 받는다
devcenter.heroku.com/articles/heroku-cli
The Heroku CLI | Heroku Dev Center
The Heroku CLI Last updated 01 September 2020 The Heroku Command Line Interface (CLI) makes it easy to create and manage your Heroku apps directly from the terminal. It’s an essential part of using Heroku. Download and install The Heroku CLI requires Git
devcenter.heroku.com
위 링크에서 자신의 운영체제에 맞는 방법으로 cli를 다운로드 한다. 다운로드 후 텍스트 에디터로 배포할 프로젝트를 연후 터미널 창에 heroku -v 명령어를 이용하여 설치가 잘 되었는지 확인한다.
윈도우에서 git bash를 사용 중 일 때 bash: heroku: command not found 에러가 나타날 경우 아래의 글을 참고.
window(윈도우)에서 heroku cli가 git bash에서 실행이 안될 때
heroku는 배포를 쉽게 할 수 있게 만들어 주는 서비스이다. heroku를 이용한 배포 방법 중 heroku cli를 이용해 배포를 하기위해 heroku cli를 다운 받았다. The Heroku CLI | Heroku Dev Center The Heroku CLI L..
jcon.tistory.com
2. heroku 내에 프로젝트 폴더 생성
heroku 홈페이지에서 직접 생성할 수도 있고, 아래의 명령어를 통해서 생성할 수 도 있다. 홈페이지에서 이미 생성을 했다면 3번으로 넘어간다.
heroku login

heroku create
3-1. 프로젝트 내의 heroku 배포 설정
heroku cli를 통해 배포하기 위해서는 package.json에서 설정을 해주어야 하는 것이 있다. 우선 engine의 값을 설정한다.
//package.json
...
 "engine": {
    "node": "12.16.3",
    "npm": "6.14.8"
  },
 ...
scripts 안에 heroku-postbuild를 설정한다. 이 명령어를 통해 heroku에 배포를 하게 되면 react의 모듈을 설치하고 빌드를 할 수 있게 한다. clinet는 react 프로젝트의 폴더 이름이다. 자신의 폴더 이름에 맞게 수정하면 된다
NPM_CONFIG_PRODUCTION=false는 package.json에서 devDependencies안의 모듈도 설치하게 하는 명령어이다. 배포 할 때 devDependencies안에 모듈이 필요가 없다면 생략해도 된다.
 ...
 "scripts": {
    "start": "node server/index.js",
    "backend": "nodemon server/index.js",
    "frontend": "npm run start --prefix client",
    "dev": "concurrently \"npm run backend\" \"npm run start --prefix client\"",
    "heroku-postbuild": "NPM_CONFIG_PRODUCTION=false npm install --prefix client && npm run build --prefix client"
  },
  ...
express의 index.js에서 react의 빌드 파일을 보여줄 수 있게 설정해준다.
//express의 index.js
...
if (process.env.NODE_ENV === "production") {
//"client/build"는 react의 build파일 경로이다
  app.use(express.static("client/build"));

//"..client"는 react 프로젝트의 파일 경로, "build"는 react프로젝트 내의 build폴더이다
  app.get("*", (req, res) => {
    res.sendFile(path.resolve(__dirname, "../client", "build", "index.html"));
  });
}
...
3-2. heroku 홈페이지 설정

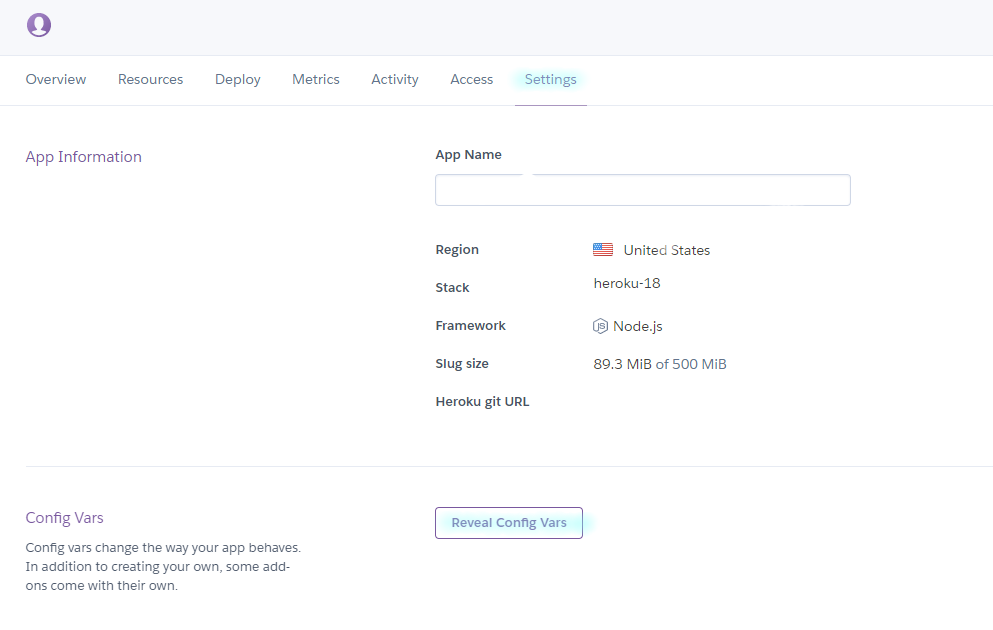
heroku 홈페이지에서 2번에 생성한 폴더로 들어간 후 setings 탭으로 간다. app name에서 이름을 변경하면 도메인 네임도 변경된다.
process.env.NODE_ENV === 'production' 설정을 사용하여 배포 모드의 변수를 설정한 것이 있다면 Config Vars에서 설정이 가능하다. Receal Config Vars 버튼을 눌러 process.env에서 사용한 키값과 밸류 값을 등록하면 된다.
이번 포스팅은 heroku 배포에 관한 포스팅임으로 .env에 대해 다루지는 않겠다. 궁금하신 분은 .env에 대해 찾아보면 된다.
4. 배포하기
프로젝트 터미널에서 heroku 로그인을 한다.
heroku logingit을 적용 중이라면 다음 스텝으로 넘어간다. 적용되어 있지 않다면 아래 명령어를 통해 적용한다.
git initremote에 heroku git repo를 등록한다
heroku git:remote -a heroku폴더이름heroku git에 push를 한다
git add .
git commit -m '커밋 메세지'
git push heroku master
위 내용은 heroku 홈페이지에서 2번에 생선한 폴더에 들어간 다음 deploy탭을 누른 후 하단에서 확인할 수 있다.
git에 push를 하면 heroku에서 3번에서 설정한 대로 모듈을 다운받고 빌드를 한 후 배포가 완료된다. 시간이 오래 걸리니 remote: Verifying deploy... done. 메세지가 나올 때 까지 기다리도록 하자.
도메인은 2번에서 생성한 폴더 - settings 하단에 domain 쪽에서 확인 할 수 있다. 위의 과정을 진행하면 heroku에 배포가 완료 된다.
'Deploy' 카테고리의 다른 글
| window(윈도우)에서 heroku cli가 git bash에서 실행이 안될 때 (0) | 2020.09.14 |
|---|---|
| apache를 통해 두개 이상의 ssl 설정 (0) | 2020.06.01 |
| 아파치 http https로 리다이렉트 (0) | 2020.05.28 |
| apache + node 설정 (0) | 2020.05.28 |
| 아파치 virtual host 세팅 (0) | 2019.08.20 |