next js에서 pwa를 적용하여 모바일에서 다운로드가 가능하게 만드는 튜토리얼 입니다
1. next js 설치
npx create-next-appnext js를 설치한다
2. next-pwa 설치
npm install next-pwanext js 프로젝트 안에 next-pwa 패키지를 설치한다
3. next.config.js 파일을 생성한다
해당 파일 안에 아래와 같이 작성한다
const withPWA = require('next-pwa')

module.exports = withPWA({
    pwa: {
        dest: 'public'
    }
})
다른 웹팩에 관련된 패키지를 적용하려면 아래와 같이 한다.
const withPlugins = require("next-compose-plugins");
const withPWA = require("next-pwa");
const withOptimizedImages = require("next-optimized-images");
const withFonts = require("next-fonts");
const FilterWarningsPlugin = require("webpack-filter-warnings-plugin");

const nextConfig = {
  generateEtags: false,
  webpack: (config, { isServer }) => {
    config.plugins.push(
      new FilterWarningsPlugin({
        exclude: /mini-css-extract-plugin[^]*Conflicting order between:/,
      })
    );
    config.resolve.modules.push(__dirname);

    return config;
  },
};

module.exports = withPlugins(
  [
    [
      withPWA,
      {
        pwa: {
          dest: "public",
        },
      },
    ],
    [
      withOptimizedImages,
      {
        mozjpeg: {
          quality: 90,
        },
        webp: {
          preset: "default",
          quality: 90,
        },
      },
    ],
    withFonts,
  ],
  nextConfig
);
4. manifest.json 파일을 만들어야 한다
App Manifest Generator
manifest.json Generate Icons The Web App Manifest allows for specifying icons of varying sizes. Upload a 512x512 image for the icon and we'll generate the remaining sizes.
app-manifest.firebaseapp.com
위 사이트를 이용하면 icon파일과 manifest.json 파일을 다운로드 받을 수 있다.
public폴더를 생성한 후 manifest.json파일과 images폴더안에 icons폴더를 넣는다.

5. meta tags를 적용한다
https://github.com/gokulkrishh/awesome-meta-and-manifest
gokulkrishh/awesome-meta-and-manifest
⚡ Awesome collection of meta tags & manifest properties. - gokulkrishh/awesome-meta-and-manifest
github.com
기본적인 메타태그는 아래와 같다
<meta charset='utf-8' />
<meta http-equiv='X-UA-Compatible' content='IE=edge' />
<meta name='viewport' content='width=device-width,initial-scale=1,minimum-scale=1,maximum-scale=1,user-scalable=no' />
<meta name='description' content='Description' />
<meta name='keywords' content='Keywords' />
<title>Next.js PWA Example</title>

<link rel="manifest" href="/manifest.json" />
<link href='/favicon-16x16.png' rel='icon' type='image/png' sizes='16x16' />
<link href='/favicon-32x32.png' rel='icon' type='image/png' sizes='32x32' />
<link rel="apple-touch-icon" href="/apple-icon.png"></link>
<meta name="theme-color" content="#317EFB"/>
메타태그는 _document.js를 생성해서 적용한다. 꼭 _document.js일 필요는 없다
import Document, { Html, Head, Main, NextScript } from "next/document";
import { ServerStyleSheet } from "styled-components";

export default class MyDocument extends Document {
  static async getInitialProps(ctx) {
    const sheet = new ServerStyleSheet();
    const originalRenderPage = ctx.renderPage;

    try {
      ctx.renderPage = () =>
        originalRenderPage({
          enhanceApp: (App) => (props) =>
            sheet.collectStyles(<App {...props} />),
        });

      const initialProps = await Document.getInitialProps(ctx);
      return {
        ...initialProps,
        styles: (
          <>
            {initialProps.styles}
            {sheet.getStyleElement()}
          </>
        ),
      };
    } finally {
      sheet.seal();
    }
  }
  render() {
    return (
      <Html>
        <Head>
            <meta charset='utf-8' />
            <meta http-equiv='X-UA-Compatible' content='IE=edge' />
            <meta name='viewport' content='width=device-width,initial-scale=1,minimum-scale=1,maximum-scale=1,user-scalable=no' />
   		    <meta name='description' content='Description' />
  		    <meta name='keywords' content='Keywords' />
 		    <title>Next.js PWA Example</title>

   			<link rel='manifest' href='/manifest.json' />
      		<link href='/favicon-16x16.png' rel='icon' type='image/png' sizes='16x16' />
      		<link href='/favicon-32x32.png' rel='icon' type='image/png' sizes='32x32' />
      		<link rel='apple-touch-icon' href='/apple-icon.png'></link>
      		<meta name='theme-color' content='#317EFB' />
        </Head>
        <body>
          <Main />
          <NextScript />
        </body>
      </Html>
    );
  }
}
favicons는 아래의 사이트를 사용하여 생성한다
https://www.favicon-generator.org/
Favicon & App Icon Generator
Upload an image (PNG to ICO, JPG to ICO, GIF to ICO) and convert it to a Windows favicon (.ico) and App Icons. Learn more about favicons.
www.favicon-generator.org
생성된 아이콘 파일들은 public폴더에 넣는다
6. pwa가 적용되었는지 확인한다
npm run build
npm run start
위 명령어를 통해 빌드 후 시작한다
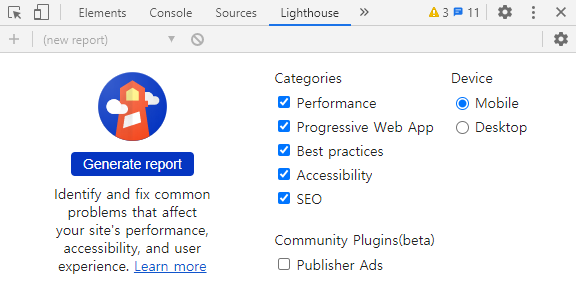
크롬에서 f12를 누른 후 lighthouse탭으로 이동하여 generate report를 클릭한다


다음 글에서는 다운로드 버튼을 만들어서 pwa를 간편하게 다운로드 받을 수 있는 방법에 대해 알아보겠습니다
pwa 다운로드 버튼 생성하기 : https://jcon.tistory.com/172
'Nextjs' 카테고리의 다른 글
| next js에서 pwa 다운로드 버튼 생성하기 (0) | 2020.08.07 |
|---|---|
| next + pwa 홈화면에 추가 버튼 생성 (0) | 2020.05.28 |
| next + pwa 설정 (0) | 2020.05.28 |
| Next js 튜토리얼 8편 : 배포 (0) | 2019.10.10 |
| Next js 튜토리얼 7편 : 컴포넌트 스타일링 (0) | 2019.10.05 |